Wednesday, August 31, 2016

Entreq Everest & K2: A perspective


The US distributor for Entreq recently sent me the new accessories for their fabulous line of grounding boxes. The Entreq grounding boxes and cables were eye opening to experience in my own system. More blackness between the notes, less noise, more texture to instruments and voices, and just a more musical presentation are but a few of the attributes of these products when set up on the right components. The Entreq Everest & K2  ($249 for the K2, $349 for the Everest) they sent were add-ons to the existing models of grounding boxes, and meant to improve performance. I was very interested in giving these items a try.

From the Entreq Web site:

"When we at Entreq found a massive new breakthrough for our metal/mineral mix, used within the Ground boxes... we accepted the challenge to find a solution where all the benefits from our new discoveries could be incorporated & applied to all existing Ground boxes and work, without limits, with our wide range of Eartha cables.
The demand was it should work from our entry level Minimus/Tellus all the way to the Olympus Tellus. Working as effectively with the entry level Eartha Copper cables as with Eartha Atlantis. It should also be easy to handle and easy to attach. This has truly been a challenge for us!"
As far as using the product they state: 
"You simply replace the wood caps on your existing ground box with either the K2 or Everest product."
Looks
The Everest and K2 had identically sized and shaped wooden housings, although it seemed my K2 has a little "extra" sanding along the tip of the edge where the post came out, so they appeared slightly more rounded. I chalk that up to variances in production.  The physical difference between the two lie in the length of the post that stuck out of them, with the post on the Everest sticking out about 1cm further than that of the K2. It was threaded internally so as to replace the wooden caps that secure the Entreq Eartha cables to the ground boxes. It appeared to be made out of aluminum or (my guess) magnesium. There didn't appear to be any powder or mixture of materials encased in the housing, but I could be wrong. It appeared to be the post and the wooden housing only.

The results according to Entreq:
MinimUs: Single Ground post only - The replacement of a K2 or Everest to a Minimus will then allow it to, at least, out perform a standard Silver Minimus! Tellus: Three Ground posts -  As above the replacement of the K2 or Everest on a Tellus will offer a performance level higher than a Silver Tellus.
Silver Tellus: Again the K2 or Everest applied to a Silver Tellus will start to approach the performance of the mighty OlympUs! 
My System
For evaluating the Everest and K2, I had the following gear in my system:

  • Tweek Geek BMF loudspeakers - 98dB efficient, 4 12" side firing powered subs, 12" front firing Faital pro midbass, Beyma TP-150H horn loaded AMT HF driver crossed at about 1100Hz. Very revealing, very dynamic, easy to drive and monstrous full range output if needed.
  • AcousticImagery Atsah 1200 monoblock amps - 1200 watts into 2 ohms, 140dB signal to noise, Hypex Ncore based amps. They idle along most of the time due to the sensitivity of the speakers.
  • AcousticImagery Jay-Sho fully balanced autoformer based passive preamp - adds NOTHING to the signal. A gorgeous pre.
  • Auralic Aries streamer with femto clock
  • Aqua Hifi La Scala MKII DAC - DFD (Direct From Digital) decoding without any digital filter. In addition it also utilizes a single-stage signal amplifier: VALVE / MOSFET direct-coupled and LED bias. It uses ECC81 tubes - a High-Frequency triode - for its low noise main feature. This is directly connected to a High-Voltage MOSFET output.
  • Dark Matter Power Conditioner - Successor to the Bybee Stealth (only the prototype exists right now)
  • Audience AU 24 SX Speaker cables & balanced interconnects.
  • Stillpoints Aperture Room Treatments
  • GIK Acoustics GridFusors diffusors
  • Sonex Whisper Wave absorbers

The Grounding Boxes
I had an Olympus Minimus and a Silver Minimus on which to try the new products. The cables I had on hand were RCA terminated Apollo and Silver Eartha cables. I used the same type of setup for each combination. The grounding boxes were connected to the preamp's signal ground for all tests. This was the most effective and revealing placement for the ground boxes in my system.

This is a very limited set of grounding boxes, cables and their applications, and by no means a comprehensive analysis. But it should supply some insights into the sonic effects of the Everest and K2 on the Olympus and Silver minimus with Apollo and Silver Eartha cables.


The Difficulty in Evaluating Entreq
Evaluating the Entreq Everest and K2 required a different procedure than normal. they needed time to "settle in" after installation. This means putting them on the grouding box, waiting a few hours to have serious listening time, listening, then removing the devices and to hear the effect their absence has on the system. It takes a lot of time and patience. This made the entire reviewing process take se

The Playlist

  • Ray Brown Trio - The Real Blues (Soular Energy)
    This is a live recording in a small venue with acoustic bass, and lots going on in the background. It's great for listening to bass and low level detail.
  • Chris Jones - No Sanctuary Here (Roadhouses & Automobiles)
    This has a powerful bass track, acoustic guitar, Chris's voice is close mic'd, and the background vocals are recorded in a somewhat reverberant space that when played back right one really gets a sense of that space. Chris's voice is a great test of upper bass and can sound boxy if something is off.
  • TrentMoller - Evil Dub (The Last Resort)
    Recorded in Q Sound, this track has great electronic bass, quick pulsating cymbals where you can hear each strike and the emphasis on certain strikes, and a real holographic sound. You can hear things behind you, spinning around you, and the sound goes from narrow to filling the entire space. Clarity in the cymbals, bass, and holographic imaging are what I am listening for here.
  • Phil Collins - I Don't Care Any More (No Jacket Required)
    It's all about the dynamics of the drums on this recording. Something my system does particularly well. At the right volume level it is goosebump inducing when things are "right" with the system.
  • Ella Fitzgerald and Louis Armstrong - Isn't This A Lovely Day (Ella and Louis)
    Great male and female vocals. Ella's voice can sound a little boxy if things aren't quite right.


Observations


Olympus + Everest:  I  put the Everest on the Olympus and let it settle in over night. The next day, I was able to hear the difference, and it was significant. The whole frequency spectrum seemed to gain more energy and push forward. The soundstage was wider and deeper, but when it moved forward into my listening space it seemed to add a sense of tension, not the relaxation that I prefer.

 I didn't care for the Everest-Apollo-Olympus Minimus combo with my system. Replacing the Everest with the wooden knob on my Olympus Minimus immediately restored a more relaxed musical presentation that was more pleasing to my ears.

I could see the Everest-Apollo-Olympus Minimus combo working well with  a tube based system or one that had a more subdued mid-high frequency response. It was too much of a good thing for my system however.

Olympus Minimus + K2 - The K2 sounded about half as powerful as the Everest, and way more agreeable in my system. I preferred this combination to the Everest, but still preferred the stock knob after prolonged listening. Here's why: I listen to a lot of different styles of music, and like my system to be able to accomodate all of them. It's a compromise I make for every day listening. The K2 allowed really good recordings to sound incredible, but poorer recordings were unbearable. The combination was not at all kind to compressed, and thin rock recordings. Streaming music suffered as well, as all of the compression artifacts were laid bare.

I could see myself using the K2 + Apollo cable + Olympus Minimus during equipment and recording evaluations, or if I really want to hear all of a great recording. The entire audible range had a clarity that was natural, rich, full of texture, detail and musically natural. If you have a library of superb recordings, and want to hear everything in them, this combination is definitely worth auditioning.

Silver minimus + Everest: This took that speed and clarity of the Silver Minimus and Silver Eartha down into the lower frequencies. It was as if the rise and decay of the music was less encumbered by noise. Rises and transients were more dynamic, sharper and not smeared. Decays just went on and on. The Everest would be a very nice and inexpensive upgrade for Silver Minimus owners.

Silver Minimus + K2: I was super impressed with this combination. It approached the Olympus in terms of tone, detail, texture and dynamics. If I hadn't heard the Olympus Minimus in my system, I would be totally happy with the Silver Minimus and K2 combination. It widened the soundstage and gave the midrange a very nice character. Bass definition was clearer as well. Again the transients and decays were more dynamic and sharper, but perhaps not quite what the Everest offered. In terms of bang for the buck I think this combination was the best.

Conclusions

This exercise really shows how important it is to hear something in your own system before buying. We as audiophiles often jump to the conclusion that the most expensive product will sound better. In this situation I assumed that the Olympus Minimus with the Apollo Cable and Everest knob would be the ultimate combination. Not so. The most satisfying combination turned out to be the stock Olympus Minimus with the Apollo cable. The next best turned out to be the Silver Minimus with the Everest and Silver Eartha cable. The best value turned out to be the Silver Minimus with the K2 and Silver Eartha cable. The Silver Eartha was substantially upgraded by the addition of either the K2 or the Everest. My advice if you are a Silver Minimus owner: Try them both. If you are looking to dip your toes into the grounding box waters, start with a Silver Minimus and Eartha Cable, then add a K2 or Everest knob at a later date.

The great news is, you can try any of these combinations on your own system and know what works before you spend your money.

Wednesday, August 17, 2016

Sometimes You Know Immediately... Review of High Fidelity's CT-1 Ultimate XLR Interconnects.

I had a customer order a pair of the new High Fidelity CT-1 Ultimate XLR interconnects recently, and before I delivered them, I had the opportunity to audition them in my own system.

Rick Schultz, owner of HFC and idea man behind their patented magnetic conduction technology, took more than a year to perfect the balanced version of his interconnects. The trick was getting the magnetic wave stabilizers to be powerful enough and small enough to fit inside a custom made balanced connector.  He finally perfected the design earlier this year and recently moved the balanced cables into production. Rick told me "The performance is beyond my expectations".

The 20lb. (!) package from High Fidelity Cables arrived the other day with 2 sets of one meter interconnects, each in it's own foam lined Pelican style hard case. The cables themselves were substantial, mostly because of the two magnetic wave stabilizers that were situated in the middle of each cable.
Pictured above: The Magnetic Wave Stabilizer that resides in the center of the CT-1 Ultimate balanced interconnect.

The connectors themselves were slightly larger than standard balanced connectors, but not heavy like the wave stabilizers. They should not interfere with standard spaced balanced input or output connectors.
The custom made connectors for the CT-1 Ultimate interconnects took over a year to develop.

A Word To The Wise

When ordering a set of these, be sure to account for the center placed wave stabilizers. There is a 99% chance that they will need to rest on something, or you risk damaging the connectors, or pulling your gear off of it's position. Be that on a shelf, on cones, whatever, the wave stabilizers are heavy enough to warrant their own space on a shelf. It would probably be best to order a long enough run to allow you some flexibility. A more budget conscious approach may be to simply move your components closer together...

Fortunately my components sit on one long bench-like table that sits very low to the ground. I have my components fairly close together, and the shelf is low enough to the ground that the wave stabilizers sat close to the floor, propped up by some Agora Acoustics MagicHexas.

Agora Acoustics MagicHexas. 
I've been on a bit of a minimalist kick with my audio system lately. I had only three components in the signal chain at the time of this review. A Lumin S1 music streamer which served as the source, DAC and preamp, connected to a pair of Acoustic Imagery Atsah 1200 monoblock amplifiers. There is a purity in simplicity that is more difficult (and expensive) to achieve with a more elaborate setup. The tradeoffs in this case being the removal of a component (preamp), and additional cables vs. the volume control on the Lumin being "lossy". Listening to both led me to choose the less component, lossy volume control combo. Fewer components & connections equalled less signal loss in this instance. This combination has allowed me to evaluate subtle changes I make to my system very, very well.

For additional tweaks not in the signal path, I had the Lumin connected to an Entreq Olympus ground box, and also had an Entreq Silver Minimus connected to the dedicated circuit's ground.  I also have the Stein Harmonizer system (2) with Blue Suns, and last the Bybee Quantum Plugs.

Other cables in the system were the Audience AU24 SX speaker cables ( perhaps the best value in audio cables today) and the power cables were a new Tweek Geek product that has yet to be named or released, but definitely up to the task of letting the music through.

Sometimes It Takes Only A Second

As soon as I inserted the High Fidelity Ultimates, I knew they were worth the asking price. The room felt as if it had just doubled in size, and the speakers disappeared, leaving a very wide, tall, deep and convincing soundstage. Balance was exquisite, and the bandwidth was extremely wide. There was deep, tuneful and thunderous bass emanating from the 4-12 inch powered subwoofers like I hadn't heard before, and the midrage had such detail and texture, again a first for my ears. The highs did not disappoint either. They had extension, clarity and ease. In fact the whole musical presentation had relaxed and decompressed from the room. The music was now in it's own space/time continuum. Spooky in a very good way.

Yes, all of that was extremely good, the best I have heard. But I have had other cables in my system come close enough to this type of performance to challenge the asking price of the High Fidelity's. What convinced me beyond a doubt that the CT-1 Ultimate cables were the best was the imaging magic that they performed. Many cables can throw a wide soundstage, but what usually is compromised is image placement and specificity. They trade focus for a wide, enveloping soundstage. The High Fidelity Ultimates did not. They maintained the image focus, and extremely good placement while creating one of the widest, most enveloping soundstages I have ever heard.

This tells me two things. The High Fidelity Ultimate XLR cables have a very low noise floor, and very good phase coherancy. 

Cables That Cost More Than The Components?

At this point I decided to try something a little unorthodox. I swapped the moderately expensive source and amps I had been using for much less expensive ones. I inserted the Lumin D1 Streamer/DAC/Pre ($2450 with Sbooster power supply) in place of the S1, and replaced the AcousticImagery Atsah 1200 amps ($9995 MSRP/Pair) for the Atsah 500's that retail for $2000 per pair. So less than $5000 in source and amplification cost, connected via a $7800 interconnect. 

Sonically, with this combination I lost a bit of texture and resolution, but I could live with that. I still had the ease, the soundstage, the imaging, along with more resolution than I had ever heard coming out of these budget components ever before. All for about the MSRP of the Lumin S1. 

This experiment turns the standard protocol for buying a system on it's head and begs the question, are we really getting the most out of our electronics when a relatively inexpensive audio system using uber expensive cable can produce sound equivalent in listener satisfaction than a system with expensive components using moderately priced cables?

What it proved to me and my ears is that there are more ways to audio nirvana than one typically thinks.

Conclusion

To my ears, and in my system, the High Fidelity XLR interconnects, specifically the CT-1 Ultimates, are the cables to beat for those looking for the absolute best listening experience regardless of price. There were absolutely no shortcomings. They did everything right, and did it like no other cable I have ever heard before. I could just sit, listen, relax and lose myself in the music. That is worth quite a lot to me, because I know all too well that when my audio system doesn't sound right, my whole world is affected. Music is my therapy, my catharsis, my escape. It makes me a bit of a freak, I know, but that is my reality. I need music, and I need really good sound in order to relax fully and get the "therapy" I need. What is that worth to me?  It is worth having these cables. These are a component, no doubt. They had that much of a positive impact on my listening experience. Can one come close to the performance of the CT-1 Ultimate for less? Probably, I can think of a few cables that come close, do cost less and could give one 80% of the satisfaction that the High Fidelity Cables deliver. But for those looking for the best listening experience, the CT-1 Ultimates will not disappoint, and definitely cost less than component upgrades, tweaks and a therapist. 

Wednesday, August 3, 2016

The Three Foundational Pillars of ANY Audio System


I am the Tweek Geek. Yes, I sell those controversial items that enhance the performance of your audio system.  Tweaks are  misunderstood, misused, and the definition of what an audio tweak is can be different for every audiophile you ask.

Here is where I stand on the matter.

  • Audio cables are not tweaks - Their careful selection is as important as the components you select. Try not to use their tonal characteristics as compensation for weaknesses in other components, as that will lead you down a very expensive rabbit hole in the long run. Where to start? Interconnects from your source component to your preamp, integrated etc. will have the greatest effect, then speaker cables, then power cords. 
  • Power conditioning is not a tweak - Clean power is essential for an audio component to perform at it's best.  That being said, sometimes a component sounds best when plugged directly into the wall receptacle. Usually the circuit the component is plugged into is a dedicated line, and I have also found that some manufacturers really pay attention to their power supplies. Often times these components benefit less from power conditioning. Usually this comes with a hefty price tag, and even then a high price is not a guarantee of a well filtered, clean power generating power supply. 
  • Experimentation is key - Never stop experimenting, trying, and learning new things. When you think you know it all, you're in trouble.
  • Tweaks are finishing touches, not bandaids - Boom. Bet ya didn't see that one coming. A guy that sells tweaks telling you he can't solve all of your problems with his wares?

    Tweaks are fine tuning devices, meant to reduce the last bit of noise, or get that final bit of resolution and "realness" from your system. Tweaks for the most part work on very small, incremental, compounding improvements. Things that the average person could care less about, but things that we as audiophiles care very deeply about. An effective series of tweaks deepens our connection to the music.

    HOWEVER, before experimenting with tweaks, I highly recommend getting the following 3 "pillars" established in your system and listening room in order to properly and effectively evaluate changes or tweaks you make to your system.

If you do not have these 3 "pillars" in place, you are not ready to put finishing touches on your system. Tweaks will only be bandaids until you address the following :

1. Clean Power 

A single, dedicated AC circuit helps deliver more current, and less noisy power to your audio components. It won't eliminate all noise, not even close. But it does put a little "distance" between your audio system and the other devices in your home. A dedicated line is still vulnerable to electrical noise pollution that leaks onto the grid from the outside world, radio frequency Interference from wifi, cell phones, etc. and from the noise generated by the audio components themselves. Placing all of your audio components on a single circuit also lowers the chances of a noisy ground loop plaguing your system.

For some components, this may be enough, but for the majority of components further noise reduction by way of power conditioning will help. But before we go there, Why not try reducing the electrical noise coming in to  your house from the outside grid, and also from within the house to your breaker box?  So, in order here is what I recommend for creating clean power to your audio system.
  • A dedicated line feeding your audio system
  • Noise filtration on the power coming in to your home
  • Noise filtration on the circuits in your home going back to the main breaker box
  • Noise filtration/conditioning of the power feeding your audio components directly

2. An Acoustically Friendly Room

You need a room that is friendly to listening to music. One that is not too absorptive, and one that is not too reflective. Too much absorption and the sound is lifeless and dead. Oddly enough, loudspeakers are tested in an anechoic chamber. No reflected sound occurs in an anechoic chamber, and therefore only the sound the loudspeaker makes is measured. That's great for taking measurements, but some people take this logic to their listening room and try to make it as absorptive as possible. Not a good idea. You need a combination of absorption and diffusion. Diffusion is the controlled scattering of soundwaves. You do not want sound waves bouncing off a wall directly to your ears. It's better for the sound to be scattered in random directions. This allows for the sound radiating from your loudspeakers to reach your ears before any direct reflected sound can reach your ears. Reflected sound when it reaches a high enough amplitude can smear the timing of the original signal, leading to a blurred stereo image and a smearing of fine detail.

Acoustic Geometry has made a great series of videos on acoustics that I highly recommend you watch.

3. Speaker Placement


Not all of us have the luxury of a dedicated listening room, but here are some minimum guidelines for getting your speakers to sound as good as possible in your space.
  • Avoid placing your speakers close to walls behind or to the sides of them. Get your speakers out in to the room. This will help to create a sense of depth in the stereo image, and will help to mitigate boomy bass.
  • If your room is rectangular, try placing them along the shorter wall first. Again, this helps with bass frequencies.
  • If your room is square, try placing your speakers off-center or at an angle to the wall behind them. This will help mitigate standing waves.
  • A good ratio for speaker width to listening position is 1 (width between the centers of speaker front baffles) to 1.3 (distance from speaker baffles to your ears). So if you have your speakers 8' apart, try placing your listening position at 10' 3".
  • Speakers that are of equal distance to the listening position have proper phase and timing with one another. 
Resources for finer placement of your speakers

After You Have Your Pillars In Place

Once you have your foundational pillars in place....Relax. Get to know your system. Enjoy it for awhile. Become so familiar with it that when you do bring in a new component, accessory or tweak that you will be able to discern how it is interacting with you, your room and your system. This will help you make better decisions on what new products might get you closer to your idea of "audio nirvana". 


Tuesday, July 12, 2016

The Curious New Device From Bybee

The Bybee Quantum Plug

35 Years of Innovation, & Driving EE's Nuts...

Jack Bybee has been creating unique, and effective devices for improving audio for over 35 years. It started with his Quantum Purifiers back in the 80's. The Purifiers looked like large resistors, but had no inductance, capacitance, and about .01 ohm of resistance. However, when you placed them in series on AC or signal lines, a dramatic reduction in noise occurred without destruction of the musical signal. They removed noise like no conventional electrical component or circuit could. This was and to this day still is controversial. But the efficacy of these devices has withstood the test of time and the scrutiny of Skeptics (most who didn't bother to try them for themselves, darned internet trolls...). Soon after their invention, he and John Curl got together to make the Bybee Quantum AC Charger which was a very successful power conditioning product. It's current iteration is the Bybee Stealth Power Purifier. His devices were also capable of being used on signal lines as well. Placing his Purifiers to my loudspeakers are what got me started down the path of the "Dark Side"as the Tweek Geek. He offers plug and play as well as DIY type devices, and his products are used in many acclaimed audio components.

Lately, his creativity has focused on making use of crystals, minerals, etc. who's properties and structure lend themselves to aligning electron orbital spin (in the case of the Quantum Signal Enhancers) to absorbing stray EMI / RFI, and to well, working on the room... This has resulted in a slew of more passive devices Such as the Quantum Signal Enhancer, Room Neutralizer, and now the Quantum Plug.

Bybee Beta Testing

Lately, I've been helping Jack test his new products. I not only test his new ideas and products in my system, but also have "sanity check groups" with whom I share the beta items with. I know the members of my group personally, I know their systems, and I trust their ears. If the product's effect is inconsistent, the idea is modified until we get a consistent result in my system and the systems of my sanity checkers, or it is scrapped.

Enter the Quantum Plug

The most recent test was on the Bybee Quantum Plug. A small device, no bigger than an audio grade wall plug with proprietary material inside that is embedded in epoxy. Jack had sent me four of these devices initially, and advised me to plug them into the Bybee Stealth power condtioner, and adjacent wall outlets.

Unexpected Results

I plugged the QP's into the recommended receptacles and sat back to listen. Huh, kinda flat and etched were my immediate impressions. Perhaps they need some break in time. So I left the system running and waited until the next day to return to my listening studio. When I did return, the sound had smoothed out considerably and had much more richness and depth in the midrange/highs than before. But the soundstage seemed to have moved backwards.  Not because of any tonal shift, it literally seemed further back than normal.

I was puzzled, but as I sat, listened and looked about my room I had a thought. What if the devices were not working on the AC, but on the room, much like the Stein Harmonizer and Blue Sun products do? With that in mind I kept one QP plugged in to the AC conditioner, and moved the others. One to an AC receptacle on the wall behind me, and the others to AC receptacles flanking my left and right, but about a foot in front of my listening position. Once moved, I left the room for an hour or two and returned. Sure enough, the smoothness and richness remained, but the soundstage was now more 3 dimensional, moving outward in the general direction of the new plug placement.

Testing

I reported back to Jack, who seemed to be slightly perplexed. I also had an idea to further test the QP's. I wanted to hear the room with no Bybee or Stein treatments, with just the QP's, with just the Stein Harmonizers, and finally with both products placed in the room.

Step 1

Step 1 was to remove all of the QP's Stein Harmonizers and blue suns that were in my room and listen. This was my baseline. It was difficult to listen to after spending so much time with all of my Harmonizers/QP's installed previously. It seemed by comparison flat, less organic, more mechanical/electronic and uninvolving with a hard top end. 

Step 2

After getting a feel for the baseline I went to just the QP's plugged in to the four locations surrounding my listening position and did more listening. 

The effect of the QP's on their own, while not quite as strong as with the Harmonizers was still there and very impressive. Considering the cost of the QP's, I dubbed them "the poor man's harmonizer". It was fascinating. A product considered to be useful for AC filtering instead was working on the room. Was it emitting a field of some sort? Perhaps. The Stein Harmonizers use battery power to generate their field. But they also have electronic circuits inside, along with a mix of proprietary material. Perhaps this was just a more rudimentary form of the same thing.

What the Bybee QP's  do is simply amazing for the price. They allow one to influence the shape and dimensions of the soundstage created by the loudspeakers. When placed well, they create a very 3 dimensional effect, with a rich, more tactile midrange and high frequency that is also smoother at the same time.  Placement doesn't have to be exact for them to work, but they do need to break in, and continue to break in for 5-7 days after they are plugged in. 

Step 3

Step 3 was to remove the QP's and place the Harmonizer system back. The Harmonizers didn't seem to need the time to settle in quite like the QP's. After only a few seconds one can hear the sweetness in the highs, the ambience that wraps around you, and the naturalness in the midrange. Listening to just the Harmonizers confirmed why they are still one of my favorite tweaks. There is just an energized, but relaxing glow to the music. Decays decay longer, more naturally. Subtle ambient cues are more apparent, making the music sound even more natural. Voices and instruments are more present, more real. Wow. More money, a lot more, but more performance.

Step 4

Finally Step 4 was putting the Harmonizers and QP's back in the system, and letting everything run together. At this point, the QP's reminded me of the Blue Suns, only slightly more powerful. I had to reconfigure the placement of my Blue Suns to complement the effect of the QP's, but once I did, it was really, really good.

I found myself relaxing, and engaging the music. Forgetting all else, just enjoying the experience.

Last: Effects On Video

My last test was on video. I'm not much of a videophile. I have a 4k TV, but do not watch TV much at all. I plugged a QP into the outlet adjacent to where the TV was plugged in, and it was also in very close proximity (right behind it).  Within 10 minutes the colors became more saturated, and the picture as a whole appeared to have more depth. It became much more 3D like. It made the 4k programming that was available to me really pop with dimensionality and color. I would say it worked very well on video.

Conclusion


The Bybee QP may very well Jack's finest accident. Originally meant for working on AC, it appears that at least for audiophiles the best use may be placing one along each wall in the room as close to the center as possible. For Videophiles, the QP may work both on proximity effect and directly on the AC, as my rather limited viewing experience had alluded to.

If I were to recommend one tweak to someone who was curious to dip their toes in the the "dark waters" of audio tweaks, I would wholeheartedly recommend the QP's first. They do something that is obvious, and pleasant to the sound once they break in, and they seem to work every time. This is of course provided the user has the three foundational pillars of a good system in place already (more on that very soon).


7/30/2016 - New Observations


A customer emailed me with a question this morning.
In your review, you say audiophiles should plug in one on the center of each wall, yet on the product page it recommends placing them in outlets near the four corners of the room.

Which have you found to be better?
A great question, and thanks for pointing out my inconsistency. Below is my explanation and answer.

The Bybee QP's are strange devices. I think there are a number of products (Stein, Synergistic Research) out there that are doing similar things using different methods and materials (or similar materials, who knows). 

At the most fundamental level, I think what they all have in common is that they are creating a field that affects the propagation of soundwaves within a certain space. To our audiophile tuned ears we percieve certain positive changes to reproduced sound when these devices are "activated" and in the room.

When I wrote the blog, it was early on in my experimentation, and my experimentation focused on seeing what the QP's did in the presence and absence of my other tweaks. I made an assumption about the QP's placement that changed in between the finishing of the blog and the writing of the product page. 

I think what is happening here is that the QP's are generating some sort of field, and placement is not terribly critical. You don't want to group 2 or more of  them together in one part of your room without balancing it out in other areas. Does that make sense?

The critical thing is that the field generated by the QP's needs to be evenly distributed throughout the room. For a listening space like yours, 1 or 2 would be adequate.

What I found to be even more important was allowing several days for the devices to stabilize the field in your room. It's a bit of a roller coaster ride for about a week.  

Tuesday, June 28, 2016

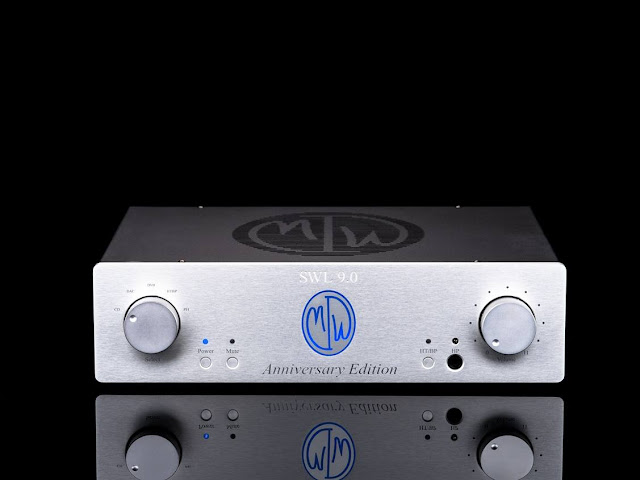
REVIEW: Modwright SWL 9.0 Anniversary Edition Preamp

Modwright SWL 9 Anniversary Edition
Modwright is celebrating their first component offering over 13 years ago with an updated remake. 

Modwright has been in business for over 17 years. Their bread and butter used to be (and still is to a degree) mods to existing products like the Oppo BDP95 & 105, as well as the Sony XA-5400 EX & HAP-Z1ES. 4 years after they opened up shop, Dan Wright introduced their first component, the SWL 9.0 preamplifier. It was a huge success. Putting Modwright on the map as a manufacturer of high quality, high value audio components. They now have a full line of amplifiers, preamplifiers, a phono stage (recently raved about in TAS and Stereophile),  an integrated amplifier and a new headphone amp destined to be an audio classic.

13 years later, the SWL 9.0 Anniversary Edition seeks to continue and build upon the tradition of high value, US made audio components. Dubbed the SWL 9.0 Anniversary Edition, this new/old preamplifier adds a built-in (and very nice I might add) headphone amp and optional phono stage. It also improves upon the old power supply and adds home theater bypass. There are 4 RCA inputs (sorry, no XLR), one tape loop, and two RCA outputs. Price: $2900. $3200 with optional built-in phono stage.
Rear view of the Modwright SWL 9.0 Anniversary Edition

Build Quality

What you see in the photos is a preamp with a thick milled aluminum faceplate, aluminum knobs, power and selector buttons, and a stamped steel chassis cover. What you don't see is that the stamped steel chassis is considerably thicker than most, leading to a very solidly constructed piece. I was quite surprised at the rigidity and solid feel, as it is not typical of components at this price point. Usually the top cover can be easily warped if one is not careful when removing it. GOT's The Mountain would have a tough time doing harm to the Modwright's top cover.

The modwright logo is set into the center of the faceplate, and is illuminated when powered on. The left knob is the input selector, with the power and mute buttons located at the bottom and to the right of it. On the right side is the volume knob, with the 1/4" headphone  jack and home theater bypass below and to the left of it. There is a retro coolness factor to the SWL 9.0 Ann Ed that harkens back to a day when all hifi gear was made to last instead of thrown into a landfill.

Inside the SWL 9.0 Ann Ed is no different. You will find high quality parts throughout, including custom made Modwright capacitors, also used in their top of the line LS 36.5 DM. The power supply is, in my opinion, spectacular for a component at this price point. With a single toroidal transformer, 2 l-cores, and a super regulator to keep voltage drift at bay. This to me is what separates real audiophile gear from mass produced toys. After all, your music is nothing more than the incoming AC waveform that is modulated. If there is garbage from the outside or inside, it will appear as distortion in the music. That is also why I am a big proponent of dedicated AC lines and power conditioning.

This is considered their "entry level", but you'd be hard pressed to find this type of build quality manufactured in the US for this price anywhere else.

Sound

I patched the SWL 9.0 Ann Ed (as I will call it) into my current system, which consists of the following:
  • Aqua La Scala DAC
  • Lumin D1 Streamer/DAC - Used only as a streamer
  • SBooster power supply for the Lumin D1
  • AcousticImagery Atsah 1200 mono amplifiers
  • Tweek Geek BMF loudspeakers (98dB, 12" midbass, 9" horn-loaded AMT, 4x12" powered Subwoofers)
  • Bybee Stealth Power Purifier
  • Entreq Olympus Minimus with Apollo cable attached to an open RCA on the preamp
  • Tweek Geek Furutech NCF power cables
  • Cover: Radiohead, A Moon Shaped Pool
  • Audience AU24 SX interconnects and speaker cables
I started out with a couple of my current favorite recordings, Radiohead's A Moon Shaped Pool, and Steven Wilson's 4 1/2. Radiohead's recording is thick, and can come across as a bit muddy.  The Modwright/La Scala/Atsah combination was outstanding. Creating a very visceral, powerful sense of presence, slam and dynamics that had me reaching for "11" on the volume knob. Absolutely no listening fatigue, regardless of the music or the volume level. 

The Steven Wilson recording was excellent. The first song 
"Book of Regrets" opens up with a Yes Roundabout-like fade in that flows into a bombastic guitar riff that later flows into a Rush like flurry of bass guitar and rapid fire drums. "Speed" "Energy" and "impact" were the words that I wrote in my notes. The bass simply growled when called for as well. Indeed a very satisfying listening session.

Cover: Steven Wilson, 4 1/2
For something a bit milder, I queued up Chris Jones' Roadhouses & Automobiles. Another excellent recording, a little more on the Blues and Country side of things. the first song starts with an acoustic guitar, and the very, very subtle sound of crickets in the background. You pick up the space around the acoustic guitar immediately, with the crickets filling in the silence. Chris Jone's voice is right there in front of you, giving a feeling of a very intimate performance. The thought that was going through my mind was Texture. The textures of the guitar and of Jones' vocals gave the music a "stop whatever you are doing and listen" type of quality. The vocal harmonies kick in on the chorus and you hear the other musicians, layered, each singing their own part. This is a recording that stirs emotion, and the Modwright pre does nothing to get in the way of that.  I felt the SWL 9.0 Ann Ed slightly outperformed my other preamp (balanced, autoformer based) I had in my system in terms of texture and what I call "soul". It might also be due to the synergy the Modwright had with the Aqua Hifi DAC and class D amps I was using. There was magic happening, and I was having a shitload of fun listening. 

Cover: Punch Bros, Who's Feeling Young 
Going more acoustic, I queued up the Punch Brothers version of Radiohead's "Kid A" from their album "Who's Feeling Young Now". I not only heard, I also felt the tension and sadness in the music. I heard the textures of the stringed instruments as well as the bodies of the resonating. I heard and felt the bow on the cello, the pick on the mandolin, everything came through in glorious detail with life-like energy, but not overemphasized or drawing attention to itself. Just a harmonious blend of music the way I could imagine hearing it if it were live.

Conclusion

What you get with the SWL 9.0 Ann Ed is what  you get with all Modwright preamps. Tremendous build quality, musicality, resolution, micro/macro dynamic impact, texture, energy and great tone. What you don't get is overexaggerated warmth or bloom typical of most audio components we consider to be "tubey". You not only hear the music sound right, you feel it. If you want your music rich, engaging and un altered, this is a fantastic component. If you are looking for something tubey to warm up the sound of your existing system, you might want to consider re-evaluating your system, as you are probably trying to "fix" an issue with a component mismatch.

Features Recap

  • Four sets of RCA inputs, one of which doubles as Home Theater Bypass.
  • Two sets of RCA Main Outputs. Adding a powered subwoofer is easy.
  • One set of RCA Tape Outputs.
  • Front panel controls: Power, volume, mute, input select, HT/BP select, headphone input.
  • Hybrid headphone amp: 1.5 Watts (25 ohm to 600 ohm load)
  • MWI remote: Volume and mute.
  • Optional MM/High Output MC SS phono stage ($300).
  • Tube Complement: (2) 5687 driver tubes (may also use 7044/6900/7119 and equivalents).

Specifications

  • Gain: 11dB
  • Input Impedance: 30K
  • Output Impedance: 800 ohms
  • Frequency Response: 20Hz to 100Khz
  • Max Output Signal: 20V
  • Distortion: .03% THD
  • Noise: -110dB
  • Dimensions: 17W x 12D x 4.5H
  • Weight: 28.5 lbs (35 lbs shipped)
  • Price: $2900. $3200 with optional phono stage added

Monday, June 27, 2016

Planting Seeds For Future Audiophiles:

Why not pick up an older receiver and give it to a
kid/young adult who shows a passion for music?

Do you remember how you discovered hifi? Perhaps it was an older sibling, or friend, or adult that introduced you to HiFi. Whatever it was, that experience left you hungry for more. It is increasingly difficult for younger people to find this experience, but perhaps there is a way for us as audiiophiles to be catalysts for creating this experience.


Fast forward to today

The reality is, most young people haven't experienced decent sound in their lifetime. Many haven't heard better than MP3 sound out of a pair of white plastic earbuds or a cheap plastic speaker. Why not help them discover what you already know about great sound?


Sharing The Love: The Idea

Here's an idea. Want to share your love of good sound and music? I've been buying receivers at yard sales, cleaning them up, and giving them to young people who express interest in good sound. All they need are speakers after that, and I point them to the Elac Debut B5 or B6 on Amazon. It's a great way to introduce someone to better sound than earbuds and Beats Pills!
ELAC Debut B6

Wednesday, June 8, 2016

Curiosity: The Force That Drives Us As Audiophiles


Every few months, I tear my system down completely. I do it to discern the efficacy of the various tweaks I use, and also to test new components.

This time, my teardown goal was to create a very good, but minimal system. I had been listening to my regular system for quite some time, but had recently replaced the BMF's with the Audience ClairAudient 1+1 V2+ speakers. I needed to break the ClairAudient's in for a customer's upcoming audition, and it created the opportunity to design a small but extremely musical system.

The Original System

The gear

This is the system I initially listened to for several days before moving on to the first test system. It gave me a sense of what was possible with the ClairAudient speakers.

I placed the Audience V2+  were 8 feet from the back wall, and a minimum of 5 feet from the side walls. The room is 39 feet long, so the wall behind my listening position was not an issue either. 

The original system was super quiet and exhibited the best characteristics of the Audience speakers, as it should (for more on that, here is the link to my review of the ClairAudient V2+). The detail level, tone and textures were mesmerizing. The soundstage width, depth and height were equally astounding. There is a purity to the sound of a full range speaker with no crossover that is hard to put into words. It creates a very emotional experience with the right music. This system exhibited a lifelike representation of music that one would normally have to spend CONSIDERABLY more money to attain. The absence of  a crossover allowed for a purity of dynamics, resolution and tone that made you stop whatever you were doing and just listen.

The Cables & Power Conditioning (these will remain in the system)

Beginning "Minimalist" System

Acoustic Imagery Atsah 500 Mono Amplifier. It uses
NCore technology and produces 700 watts into 4 ohms.

I used the built in DAC and volume control on the Aries Mini in my effort to simplify the system. Trying to see what the minimum configuration might sound like. I let the new configuration warm up for a couple hours before listening. It most certainly was not as good as the original system, but if someone were looking to build a system over time, the above components would certainly provide a very satisfactory sound. It was slightly edgier, with a smaller soundstage and less detail. The tone was a little warmer in the midbass, and it added a slight coloration to male vocals. Adding the Bybee Gold Crystal RCA adapters to the amp inputs smoothed out the edges and added more width and depth to the soundstage. A pair of High Fidelity Cable Magnetic RCA adapters at the source end (a second set of Bybee adapters will not fit on the narrow RCA outputs of the Aries Mini) adds a tiny bit more transparency and overall dynamic snap.

But the real insanity was this...
I didn't use speaker cables to connect the Atsah amps to the ClairAudient speakers. Instead, I used a single Bybee SE speaker purifier to connect speaker to amp. The binding posts were spaced well enough to accomplish this task, and the results were spectacular.
Speaker setting atop Acoustic Imagery Atsah 500,
Agora Acoustic Magic Hexas separating the two.

Bybee Connection from amp to Speaker..
No speaker cable required.
The Bybees added even more  resolution and musicality to the already great sound. Most noteable was the sense of openness and the incredible disappearing act the speakers did. The spacing is nearly perfect when you place a set of Agora Acoustics MagicHexas between the Atsah 500 and ClairAudient speakers. Eliminating the need for speaker cables entirely.  Not bad for a sub $5000 system*.

The coherance, textures, imaging and soundstaging were first rate. Downright shocking. This system excels at acoustic and vocal music, but can play anything short of dubstep. You are not going to have deep bass in this setup unless you invest in a subwoofer. But what you do get with this system is music that will draw you in with life like tone and energy.

So now the question became "what would happen if I added the Auralic Linear Power Supply and bypassed the internal volume control on the Aries Mini for a regular preamp"? These were the obvious weak links in the system, and the next step in the evolution of the system. This will have to wait for our next episode however... Stay Tuned!


*Sub $5000 for Audience V2+ speakers, Auralic Aries Mini, and 2 Acoustic Imagery Atsah 500 Amplifiers.